here’s how you can securely mount any tv
If you are looking for Best TV mounting service in Saskatoon then you are at the right place we have professional handyman for your requirement. We are expert in Tv Installation. Best TV mounting service in Saskatoon Tv Installation in Saskatoon
Or if you want Mount your TV your self then you can read this article it will really helpful for you.
SECURELY Mount a TV to the Wall in 5 Simple Steps
Here you go…to your wall in just five simple steps our first step is to get everything prepared if you haven’t already make sure to unbox all of your equipment so that’s your tv and the tv mount thatyou’ve purchased but if your tv has legs or feet or a stand of any sort you want to make sure to take those off now just for reference the tv mount i’m using here supports up to 135 pounds this tv weighs way less than that so we’re more than secure on that and then this is available on amazon for a little over a hundred dollars don’t do what i did and go to costco i paid 150 thinking i’d get a really you know best price on that but it was actually a lot cheaper on amazon so i’ll put links in the description.
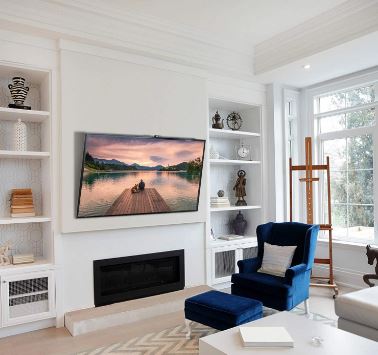
Best TV mounting service in Saskatoon Tv Installation in Saskatoon
Below if you want to try this one step two is determining approximately where on your wall you want your tv to go the main thing you have to keep in mind here is line of sight so if you’re going to be sitting down on a sofa for example you want to put the tv basically right at eye level the middle of it but then maybe shift it up just a little bit you’ve got usually about a five degrees of movement that you can see with your eyes comfortably without moving your head up and down so you want to keep that in mind now here we’re in an exercise room and so we are standing up pretty much all of the time when we’re watching what’s on the tv so with that in mind we’re going to want to put this pretty high higher than you might place it in a living room or a family room or something like that so based on the size of tv that we’ve got
here i’m thinking that if we come down probably anywhere from 9 to 12 inches is where we’ll want the top of the tv to be able to comfortably see the middle of it that should work for both my wife and i and i think that’s about where we want to go and then as far as the horizontal placement sometimes you want to make sure you get that right on the center of the wall or as close as you can and then other times you want it off center and so in this case we have a treadmill right here so we’re going to keep this off to this left side kind of in this range range or region right here so that’s where i know i want it and we’re ready to move on to step three now i’m someone who hates math and i don’t want to figure out a bunch of measurements so there’s a kind of easy way around this what i’m going to do is mount on the tv bracket itself and then mount the bracket to the mount and get everything installed here just temporarily so that we can see what our exact measurements are without having to subtract and add and figure out the offsets and all that funky stuff so first thing we’ll do is make sure to follow the instructions on whatever tv mount you have if you have this exact same one you can kind of follow along with what i’m doing but check out the instructions that come with yours so that you make sure you get this right you’re always going to have this huge bag of screws and washers and all kinds of fun stuff in here little spacers and this is just to make sure that you get the exact right fit for your tv so you will not use 99 of this stuff for.
90 of it so i’ve already selected out the ones that i need and one of the most important things you want to see here is that we don’t use the wrong screws to mount the bracket to the tv you can see right here that this screw here is not very long you know it’s pretty short but as i start to thread it in what happens is pretty quickly right there it bottoms out i’m not going to push that any further because if i do it could be applying pressure to the screen itself which could damage it now typically there’ll be a plate back here to protect that but the last thing you want to do is put too much pressure on your screen which could crack or ruin that so you need a shorter screw so luckily we have these ones that are the same thread pitch the same threads but a lot shorter and you’ll notice that as i thread this one in it bottoms out that’s the one.
We need to use so now that i have the bracket in place i’m able to use one simple measurement to figure out where this bracket needs to go on the wall to get the tv in the perfect spot so if i want to use the top of the tv as a reference point then i just need to measure from the top to one of my holes down here where i’m going to drive a lag bolt through so in that case 17 inches so i can use that or if i want to go from the bottom i can do that as well and that’s going to be about three and a half inches step four is to mount our wall mount portion of the tv mount to the wall itself and we’re gonna drive those in with some lag bolts and one thing that’s critical here is that we mount these into the studs behind the drywall in order to do that we’re going to use a center finding stud finder there’s a lot of stud finders out there and this one i think will do a great job for what we need so i’ve got it on regular stud scan here and as i move it across the wall it’s going to show a stud finding there and there’s our center it’s got a little notch in the top here so i’m going to mark that and the important thing about this is it’s not just finding the stud itself but it’s helping us locate the exact center of it here’s another maybe there we go then we’re off the stud okay so now that we have our studs marked here and here we just need to verify that those are 16 inches on center and we’ll work with our template and they better be because i framed this basement myself so hopefully i did this right there we go 16.
Best TV mounting service in Saskatoon Tv Installation in Saskatoon
we’re exactly where we need to be so with that i’m now going to use the template to try to see if these will line up perfectly with our template if your wall mount doesn’t come with a template like this you can just use your tape measure to get your measurements or you can just put the actual wall mount right up to it but since we have this we’ll go ahead and use it and i can see here i’ve got an opening here and here so we’re perfect so we just need to set our height at this point and i know from what we talked about earlier with as far as how far down.
We want it we want as close to the tops of these as possible so i’m going to bring it right down to about here i’m going to mark this area but before we drill anything or mark it out we need to make sure we’re level now that we have our two spots marked from the template we want to make sure we’re level and i’m guessing i thought these might be pretty close but they’re actually not so i’m looking here and we need to go quite a bit down on the left side here to get it to where it’s level right about there so i’m going to mark that there here now just a quick tip anytime you’ve got an outlet or something that requires a box in the wall it’s almost always going to be mounted to a stud in this case i’ve actually got two i’ve got some speaker wires in here and so these are both straddling a stud so i know that basically it’s going to be right in the middle and if you just have one it’s going to be on one side or the other so that can help you find where the stud is pretty quickly.
Now we’ll take our template back up here and with that in place we can mark our bottom holes as well and there so our next step is to choose the right size drill bit and typically that’s going to be in your instructions for your tv mount but the gist of it is any screw lag bolt anything like that to pre-drill it you want to make sure that the pre-drilled hole is the same diameter as the shaft of the screw without the threads if you do it with the threads there’s nothing for it to grab onto and if you do it too small it’s going to tend to split that stud which is again not something that we want okay now we’ll do the same on the other three and then we’re ready to mount it.
Then we’ll take our first lag bolt and drive it in there we go okay so that’s on there fairly tight that’s plenty tight for now i can come back around to these and tighten them all up individually when i’m done now one thing i completely neglected to do in my haste here was i forgot to put the washers on the lag bolts so you should put those on they do come with the kit and i didn’t but fortunately we have a pretty wide head on these lag bolts so it’s not really going to be an issue i’m not worried about them slipping through or anything like that but for your sake remember to put those on it does help and now next we’re ready to put our articulating arm on and this just slides under the top lip and then slips into place like that and then i’ve got four little hex heads that i’m going to put in here with washers this time and fasten this in place.
Now i’m about to test this thing out but i weigh 200 pounds this is rated for 135 so we’ll see how this goes but if it does hold me you should totally check out some of my t-shirts and hoodies and all that fun stuff links are in the description below but let’s give this thing a try here we go okay it works go click on that link yeah please quick do it before we mount the tv itself there’s a cool little idea that they had here where you can stash the hex key in there and then it’s got these decorative covers that go over so we’ll put one in one end and we’ll do the same thing on the bottom so now with everything in place we’re just going to drop the tapered end into the hook like this and this thing is ready to go so we just have one screw left to put in the bottom and it’ll be nice and secure now that you’ve completed those five simple steps and you have your tv beautifully mounted to the wall there’s two bonus steps i have for you the first one is you deserve a nice cold drink i’m gonna enjoy a coca-cola and the second step is if you’ve got any wires underneath your tv i’ve got a video right here to show you how you can quickly and easily get rid of those for good in a way that’s totally up to code my name is nils with learn to diy thanks for reading.
Best TV mounting service in Saskatoon Tv Installation in Saskatoon